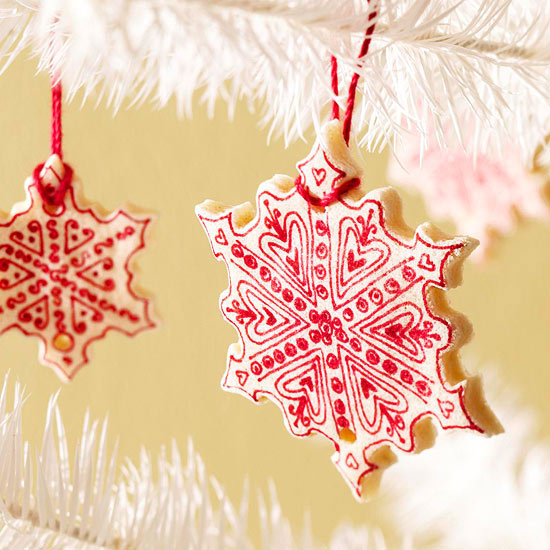
Holiday Salt-Cookie Ornaments!!
I love doing crafts with my kids. And holiday season gives me lots of opportunity. I also find that it helps me my “control freak” a bit of a break. I mean, there is no way 5 year olds are making perfect ornaments with straight lines and pretty lettering. So it’s a free for all with lots of shiny stick on thingys and crazy paint patterns, and some painted shiny stick on thingys. And once we’re all done, the kids get to help me hang them up. What a joy it is to see the pride on their faces.
The best part? Well, when company comes over, everyone gets a guided tour of the decorations and who made what. It’s a veritable tourist attraction!

I start early, putting my decorations up so they’ve got a month of ‘show time’ before packing them up again. And every year, we make some more. We keep the best of the lot for ourselves (yes, we’re greedy), and then we give them away as little gifts for friends and family.
It’s a tradition in our home. We do the same with cookies too (the kinds you can eat). I sort of wish that every day of the year could feel just like this day. Maybe we’ll have to start making them for Valentine’s day…birthdays….well, it’s endless!!


Preheat oven to 200 degrees F
Ingredients
½ c table salt
½ c warm water
1 c plain flour
Food colouring if you want to colour your dough
Instructions
Add the salt to the warm water and dissolve. Add food colouring to water if desired. Mix in the flour slowly.
Kneed on floured sureface for 5 minutes
Roll out dough to approximately ¼” thick (I like to roll out on flour-dusted parchment paper)
Use cookie cutters to cut out your shapes
Poke a hole in the top of your ornament with a straw or skewer for string or ribbon to hang later.
Place shapes on a cookie sheet and bake for 2-4 hours until hard.
**Keep in mind, if the oven is too hot, they will bubble in the center. You want to dry them slowly.
Remove from oven and let cool.
DECORATE!!
You can use markers, paint, puffy paint, glitter, beads, ribbon and glue…whatever you like!! And if you’d
Like to seal them, use Podgy or something similar. But wait to seal them until the paints are totally dry!! And don’t podgy over markers, they smudge.
Put a string or ribbon through to hang. We used ornament clips in the photo of my wreath above.


Oh have fun!! I’m thinking of having a grown up girls night in this year, where we can drink up some wine and make some beautiful ones!! I’ll pre-make them and have it all set up when the ladies arrive…hmmm…bye now! Gotta go email an invite!!
Have a terrific Holiday Season this year. From my family to yours, may your days be merry and bright, filled with joy and laughter, and filled with plenty of Kodak moments.
Have a terrific day!
XR
PS: Stay tuned for Design Trends 2015!! Coming soon!!
Oh, and sign up on our blog page to never miss a post again!!


